

I receive many mails from people who are interested in creating an audio-blog for themselves but are unfamiliar with how to record their voices on the computer. I have written this tutorial to help them kick-start their singing. I have also included how one could possibly make a Karaoke. However, it must be kept in mind that this is only a basic guide for Karaoke singing using some of the freely available softwares. If somebody wants to take up singing and recording seriously for recording albums, he or she has to go a studio. What is illustrated is pretty much for fun.
Essentials:
Any basic recording set up would require the following (approx price in the braces):
1. Computer - $800
2. Sound card - $200
3. Microphone - $100
4. Headphones - $50
5. Recording software - $0
If you discount the computer cost, you would incur not more than $350 which is very good for home recording.
1. Computer:
OS - Windows 2000/XP
RAM - 512 MB
Disk space - at least 1 GB
Sound in a computer is a file. Computer recognizes multiple formats off which WAV and MP3 are the most popular in the music circles. WAV is un compressed audio file whereas MP3 is a compressed format without a considerable loss in quality. Almost all the audio blogs these days use MP3s. Typically an Indian song is 5 to six minutes long. A commercially recorded CD track when converted to WAV format typically at 44.1 kHz and 128 kbps produces a file which is approximately 10 MB / min of song length. Thus a WAV file is usually 50 to 60 MB in size. When compressed to MP3 format, the file size becomes approximately 1/10 of the original WAV file.
Why is WAV file important ? That is because the computers and most of the music softwares in the world recognize WAV files (exception being real player) and when you record audio on to a computer it is always a WAV file. since WAV files are 50 to 60 MB in size, a computer with a disk space is necessary. Moreover, the music softwares perform a lot of floating point calculations and hence at least 512 MB RAM is necessary.
And for the Operating system I use Win XP with SP2 and I am very happy to recommend it.
2. Sound card:
The sound card of the computer is the heart of sound generation both for playback and recording. However, most of the sound cards that come bundled with either the desktops or laptops are of inferior quality and I strongly discourage using them. ( Can a sound card that is bundled with the laptop or desktop (usually on-board) do the same job ? Answer is yes. however, it would have high background noise and latency ). Since you want to sing and record an inexpensive home studio sound card would do wonders.
When opting to go for a good soundcard, you need to decide whether you want an internal (PCI) or external portable sound card. I strongly recommend external soundcard since they are easy to install and are highly portable. Also you donot have to install a PCI component yourself if you are not good at such things.
I suggest one of these three - All are excellent:
1. Tascam US 122L
2. M-audio - Fast Track USB / fast Track Pro
3. M-audio - Firewire solo
The first two soundcards are USB based. Third one is based on Firewire. I have used all these three myself and I have had no issues with them. They are stable and offer excellent sound. You should be able to purchase it from an online store or zzsounds.com.
If you are using the sound card with a laptop, you may have to buy an external power adapter to boost the elecrical signal. It may not be needed for USB based soundcard, but definitely needed for Firewire based sound cards.
Installation is really simple and straight forward. You would install the driver and then connect the hardware. Reversing the process will lead to instability sometime. Once you have installed the soundcard, internal or external, make sure that you restart the system and enter the BIOS and deactivate the internal on-board sound card and restart. This will make the computer use your new soundcard exclusively. Any sound generated, like for e.g. if you play a song on the computer, can be heard in your new soundcard. And you will see what a difference it makes especially if you are listening to some compositions of Rehman.
3. Microphone and pop filter:
There are two types of microphones:
1. Dynamic
2. Condenser
An excellent article on comparing these two types can be found here. In my opinion, a condenser mic is unnecessary for a person who wants to record just vocals. A dynamic microphone is more than sufficient. In fact, most of the audio bloggers I know use dynamic microphones. The dynamic microphones are cheap and certainly reliable and rugged. The brands that I suggest are:
1. Shure - SM58
2. Shure - SM57
3. AKG-80
Most of the songs I have posted on my blog were recorded with a $30 Sony mic (which I bought when I was on a shoestring budget). It is good enough for me, but I do have an AKG-80 with which I have recorded 2 or 3 songs. I strongly recommend SM58.
Condenser mics need phantom power of 48 V. Do not supply phantom power to dynamic mic.
A pop filter reduces the "pop" sounds when you open your lips for saying some syllables. Buy a Nady pop-filter. Pretty good. It should be place between your mouth and the mic.
4. Headphones:
I have audio-technica headphones. They are warm to the ears and cheap for the wallet.
5. Recording Software:
Most of the soundcards come with a lite version of a professional recording software these days - for e.g. Ableton Live or Cubase SL. These are very powerful softwares and if you know how to get them working for you, you do not have to read further. However, if you end up buying a cheap soundcard with no free software or a soundcard with software which you fear is way too complicated, read on.
I recommend Audacity (Better download the stable release, I am never a fan of over-functional but undependable betas) - a free software which is more than sufficient for home-studio-vocal recordings.
Also download the LAME MP3 encoder which is available along with Audacity.
Recording:
Any recording has at least 3 stages:
1. Preprocessing setup :
a. Ensure that the microphone gain in your mic input of soundcard is not more than 40%.
b. Ensure that you dont have speakers on, but that you hear the output in headphones. This prevents unnecessary feedback.
c. Ensure all cables are functional. I bought a new mic once without realizing that the old mic was fine but the cable was faulty.
d. Your mic inputs or line-in inputs of the computer are NOT to be used anymore. Only the inputs in the sound card should be used. So, if you have connected a mic to yo your laptop or the desktop (which is actually the input on he internal sound card which had been disabled in the BIOS), remove it and plug it into the sound card input
e. If you want to record guitar the procedure is the same except that you will need to attach an electrical "pick up" unit on the guitar and connect the output from that unit to the input of the sound card.
f. Try to be in a noise-free place. Dynamics mics are usually unidirectional and usually pick-up sounds that are in the line with the central axis of the mic. So, do not stay too far away from the mic when recording. Place the mic close to your lips and just at a distance which would allow pops and clicks to not get recorded. Use a pop filter and mic stand if needed. (Do not try to wield the mic like Kamalhassan did in ennadi meenakshi or Shankar did in vaasamillaa malaridhu. That constitutes not only manhandling, but also will record nothing.)
2. Recording with software:
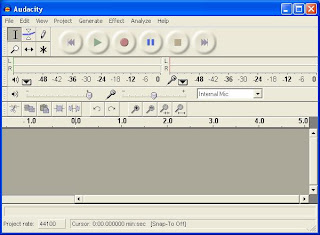
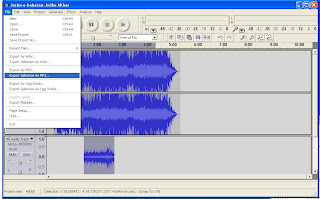
1. Open Audacity. You should see:
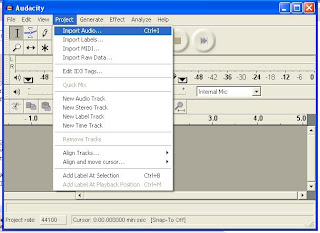
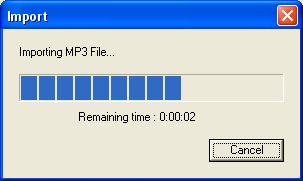
2. Use - Import Audio to import the Karaoke track you have. In this example I have used Jashne-bahara
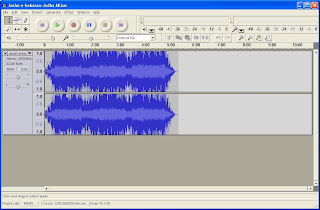
3. You should see the Karaoke track now
4. Play the karaoke track and get the pointer to the position when you want to start recording. (It is usually a good idea to position the pointer atleast a couple of bars before the position from which you would like the vocals to be recorded. this gives you the sense of rhythm and shruthi).
5. Press the record button on top. The moment you do that, another track (mono) should appear below the Karaoke track and will start recording you voice if everything is properly connected.
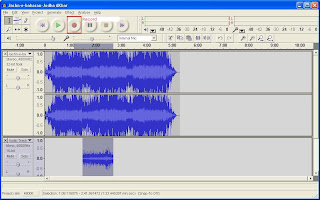
6. Play back to see if the voice+karaoke sounds good.
7. Repeat step 5 till you record all of the vocals. Everytime you press the record button you would have a new track. Thus unless you sing it in one stretch you will have multiple tracks of vocals. If you made a mistake in any track, just use the close (X) button on the track. Track is removed.
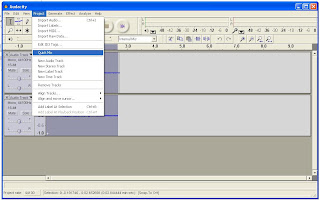
8. Once you are done recording vocals in multiple tracks, select all the vocal tracks (selected tracks get highlighted by blue) that perform a quick mix (Project--> Quickmix ) to obtain a single vocals track.
3. Post Processing your vocals and exporting the mix
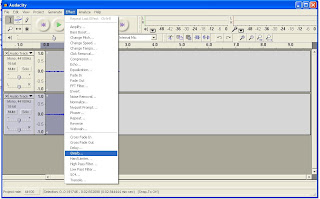
1. Now your vocal track is dry. that is how it should be recorded. When you play you would find that it probably lacks some effect. I do not use multiple effects since I am mostly unfamiliar with them. The only effect that I use is reverb. This can be done first by duplicating the vocals track and adding reverb to it. This way the original dry track is preserved in case you goof up. Press Ctrl-D to duplicate your vocal track and select the duplicate track.
2. Open Effect --> Gverb
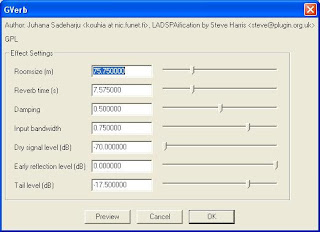
3. Play with the parameters, preview the effect on the vocals and play the "effected" track with Karaoke to see if everything is fine. Do not forget to mute the original vocals track (Don't close it. You will lose it !)
4. Once you are satisfied with the result, export the whole of the project or a selection of it as mp3.
5. Get an audio blog account : ( hipcast, muziboo, esnips, odeo ), upload this and publish it ! Thats it. You are done.
Preparing a Karaoke Track by removing vocals:
I am not going to elaborate on this since there is an excellent video tutorial on youtube
http://www.youtube.com/watch?v=JEjzdurnJhw
If you get some weird results, just remember that you do not need to invert the whole track but only those parts which contain the vocals. So, you could alternatively duplicate the track, silence the portion which does not have the vocals and invert. This kind of Karaoke creation is limited and a better option would be to obtain Karaoke tracks from shops.
Downloading Karaoke Tracks :
Some websites where Karaoke Tracks may be downloaded / purchased are:
1. http://www.esnips.com/web/IndianKaraokeTracks
2. http://www.melamaudios.com
3.http://www.4shared.com/dir/10484349/77a94d76/Malayalam_Karaoke_Film_Songs.html
4. http://karaokes4you.co.nr/
Also check out George Kuruvilla's write up here : http://blog.gksden.org/?p=260
Disclaimer : The brand names used here are only for illustrative purposes. The opinions expressed on branded products must be considered non-promotional and disinterested.
Essentials:
Any basic recording set up would require the following (approx price in the braces):
1. Computer - $800
2. Sound card - $200
3. Microphone - $100
4. Headphones - $50
5. Recording software - $0
If you discount the computer cost, you would incur not more than $350 which is very good for home recording.
1. Computer:
OS - Windows 2000/XP
RAM - 512 MB
Disk space - at least 1 GB
Sound in a computer is a file. Computer recognizes multiple formats off which WAV and MP3 are the most popular in the music circles. WAV is un compressed audio file whereas MP3 is a compressed format without a considerable loss in quality. Almost all the audio blogs these days use MP3s. Typically an Indian song is 5 to six minutes long. A commercially recorded CD track when converted to WAV format typically at 44.1 kHz and 128 kbps produces a file which is approximately 10 MB / min of song length. Thus a WAV file is usually 50 to 60 MB in size. When compressed to MP3 format, the file size becomes approximately 1/10 of the original WAV file.
Why is WAV file important ? That is because the computers and most of the music softwares in the world recognize WAV files (exception being real player) and when you record audio on to a computer it is always a WAV file. since WAV files are 50 to 60 MB in size, a computer with a disk space is necessary. Moreover, the music softwares perform a lot of floating point calculations and hence at least 512 MB RAM is necessary.
And for the Operating system I use Win XP with SP2 and I am very happy to recommend it.
2. Sound card:
The sound card of the computer is the heart of sound generation both for playback and recording. However, most of the sound cards that come bundled with either the desktops or laptops are of inferior quality and I strongly discourage using them. ( Can a sound card that is bundled with the laptop or desktop (usually on-board) do the same job ? Answer is yes. however, it would have high background noise and latency ). Since you want to sing and record an inexpensive home studio sound card would do wonders.
When opting to go for a good soundcard, you need to decide whether you want an internal (PCI) or external portable sound card. I strongly recommend external soundcard since they are easy to install and are highly portable. Also you donot have to install a PCI component yourself if you are not good at such things.
I suggest one of these three - All are excellent:
1. Tascam US 122L
2. M-audio - Fast Track USB / fast Track Pro
3. M-audio - Firewire solo
The first two soundcards are USB based. Third one is based on Firewire. I have used all these three myself and I have had no issues with them. They are stable and offer excellent sound. You should be able to purchase it from an online store or zzsounds.com.
If you are using the sound card with a laptop, you may have to buy an external power adapter to boost the elecrical signal. It may not be needed for USB based soundcard, but definitely needed for Firewire based sound cards.
Installation is really simple and straight forward. You would install the driver and then connect the hardware. Reversing the process will lead to instability sometime. Once you have installed the soundcard, internal or external, make sure that you restart the system and enter the BIOS and deactivate the internal on-board sound card and restart. This will make the computer use your new soundcard exclusively. Any sound generated, like for e.g. if you play a song on the computer, can be heard in your new soundcard. And you will see what a difference it makes especially if you are listening to some compositions of Rehman.
3. Microphone and pop filter:
There are two types of microphones:
1. Dynamic
2. Condenser
An excellent article on comparing these two types can be found here. In my opinion, a condenser mic is unnecessary for a person who wants to record just vocals. A dynamic microphone is more than sufficient. In fact, most of the audio bloggers I know use dynamic microphones. The dynamic microphones are cheap and certainly reliable and rugged. The brands that I suggest are:
1. Shure - SM58
2. Shure - SM57
3. AKG-80
Most of the songs I have posted on my blog were recorded with a $30 Sony mic (which I bought when I was on a shoestring budget). It is good enough for me, but I do have an AKG-80 with which I have recorded 2 or 3 songs. I strongly recommend SM58.
Condenser mics need phantom power of 48 V. Do not supply phantom power to dynamic mic.
A pop filter reduces the "pop" sounds when you open your lips for saying some syllables. Buy a Nady pop-filter. Pretty good. It should be place between your mouth and the mic.
4. Headphones:
I have audio-technica headphones. They are warm to the ears and cheap for the wallet.
5. Recording Software:
Most of the soundcards come with a lite version of a professional recording software these days - for e.g. Ableton Live or Cubase SL. These are very powerful softwares and if you know how to get them working for you, you do not have to read further. However, if you end up buying a cheap soundcard with no free software or a soundcard with software which you fear is way too complicated, read on.
I recommend Audacity (Better download the stable release, I am never a fan of over-functional but undependable betas) - a free software which is more than sufficient for home-studio-vocal recordings.
Also download the LAME MP3 encoder which is available along with Audacity.
Recording:
Any recording has at least 3 stages:
1. Preprocessing setup :
a. Ensure that the microphone gain in your mic input of soundcard is not more than 40%.
b. Ensure that you dont have speakers on, but that you hear the output in headphones. This prevents unnecessary feedback.
c. Ensure all cables are functional. I bought a new mic once without realizing that the old mic was fine but the cable was faulty.
d. Your mic inputs or line-in inputs of the computer are NOT to be used anymore. Only the inputs in the sound card should be used. So, if you have connected a mic to yo your laptop or the desktop (which is actually the input on he internal sound card which had been disabled in the BIOS), remove it and plug it into the sound card input
e. If you want to record guitar the procedure is the same except that you will need to attach an electrical "pick up" unit on the guitar and connect the output from that unit to the input of the sound card.
f. Try to be in a noise-free place. Dynamics mics are usually unidirectional and usually pick-up sounds that are in the line with the central axis of the mic. So, do not stay too far away from the mic when recording. Place the mic close to your lips and just at a distance which would allow pops and clicks to not get recorded. Use a pop filter and mic stand if needed. (Do not try to wield the mic like Kamalhassan did in ennadi meenakshi or Shankar did in vaasamillaa malaridhu. That constitutes not only manhandling, but also will record nothing.)
2. Recording with software:
1. Open Audacity. You should see:

2. Use - Import Audio to import the Karaoke track you have. In this example I have used Jashne-bahara


3. You should see the Karaoke track now

4. Play the karaoke track and get the pointer to the position when you want to start recording. (It is usually a good idea to position the pointer atleast a couple of bars before the position from which you would like the vocals to be recorded. this gives you the sense of rhythm and shruthi).
5. Press the record button on top. The moment you do that, another track (mono) should appear below the Karaoke track and will start recording you voice if everything is properly connected.

6. Play back to see if the voice+karaoke sounds good.
7. Repeat step 5 till you record all of the vocals. Everytime you press the record button you would have a new track. Thus unless you sing it in one stretch you will have multiple tracks of vocals. If you made a mistake in any track, just use the close (X) button on the track. Track is removed.
8. Once you are done recording vocals in multiple tracks, select all the vocal tracks (selected tracks get highlighted by blue) that perform a quick mix (Project--> Quickmix ) to obtain a single vocals track.

3. Post Processing your vocals and exporting the mix
1. Now your vocal track is dry. that is how it should be recorded. When you play you would find that it probably lacks some effect. I do not use multiple effects since I am mostly unfamiliar with them. The only effect that I use is reverb. This can be done first by duplicating the vocals track and adding reverb to it. This way the original dry track is preserved in case you goof up. Press Ctrl-D to duplicate your vocal track and select the duplicate track.
2. Open Effect --> Gverb


3. Play with the parameters, preview the effect on the vocals and play the "effected" track with Karaoke to see if everything is fine. Do not forget to mute the original vocals track (Don't close it. You will lose it !)
4. Once you are satisfied with the result, export the whole of the project or a selection of it as mp3.

5. Get an audio blog account : ( hipcast, muziboo, esnips, odeo ), upload this and publish it ! Thats it. You are done.
Preparing a Karaoke Track by removing vocals:
I am not going to elaborate on this since there is an excellent video tutorial on youtube
http://www.youtube.com/watch?v=JEjzdurnJhw
If you get some weird results, just remember that you do not need to invert the whole track but only those parts which contain the vocals. So, you could alternatively duplicate the track, silence the portion which does not have the vocals and invert. This kind of Karaoke creation is limited and a better option would be to obtain Karaoke tracks from shops.
Downloading Karaoke Tracks :
Some websites where Karaoke Tracks may be downloaded / purchased are:
1. http://www.esnips.com/web/IndianKaraokeTracks
2. http://www.melamaudios.com
3.http://www.4shared.com/dir/10484349/77a94d76/Malayalam_Karaoke_Film_Songs.html
4. http://karaokes4you.co.nr/
Also check out George Kuruvilla's write up here : http://blog.gksden.org/?p=260
Disclaimer : The brand names used here are only for illustrative purposes. The opinions expressed on branded products must be considered non-promotional and disinterested.
Thank you so much for the info, Murali! It was worth the wait! :)
ReplyDeleteSoumya
Nice article ! I have always trouble with getting right amount of Reverb ...What is your usual setting for GVerb ? :-)
ReplyDeleteThanks,
-Vishal
Highly informative!!!!!
ReplyDeletevery nice article.
ReplyDeleteone thing i have trouble with is what parameters to choose for the gverb. it is so complicated with so many variables that i have ended up not using it after trying a few combinations with very poor result. i add echo in sound recorder on xp usually.
Nice article. I do have a dumb question though. I intend to use the built-in audio device on my laptop. The laptop has a single mic input(1/8" diameter), but karaoke mics have a large jack. So, do i need some type of converter? What if i want to use two karoake mics but there is only one mic input on the labtop?
ReplyDeleteThanks!
YEs you would need one. If you are in USA, Just take your laptop and mic to Radioshack. They will give you the adapter needed.
ReplyDeleteActually, I dont use GVerb (or audacity) myself. you can use freeverb which I believe is very useful too.
ReplyDeleteThat was a great article for newcomers into audio blogging like me. Can you share any information about the external soundcards that are compatible with USB microfones ??
ReplyDeleteThanks a ton !!!
Vivek
thanks murali. thanks a lot
ReplyDeletethank u so much.. i was struggling with complicated s/w's .. thanks for this.. I followed ur steps.. when i played karoke+voice, I have a problem.. there s 1/2 seconds lag between my voice n the track.. my voice cums later.. can u figure out the reason please??
ReplyDeleteOne reason for the lag could be a bad sound card. Please purchase one of the above soundcards and install. It should mostly take care of the issue.
ReplyDeletehey sound card ,its not the default one.. I bought it recently exclusively for recording, creative 5.1
ReplyDeletePlease return creative to the store. It is cheap - in price and quality. Buy one of the above sound cards.
ReplyDeleteThanks a lot Murali.
ReplyDeleteThanks a loot for sharing this info! I am currently using the default sound card on my laptop and the mic I had bought a while back for skype chatting!!! (logitech headphones + mic). I was looking into buying a good mic and maybe sound card and found your article very useful. I have vista on my laptop. Do you think there will be issues?
ReplyDeleteVista will not be an issue if the appropriate sound card driver is installed.
ReplyDeleteMurali,
ReplyDeleteI stumbled upon your blog a couple of months back. I was inspired to do some songs on my own after listening to yours and reading this article on recording too. All thanks to you for the unknown inspiration. Please find my first recording at http://raja-myspace.blogspot.com/2008/12/my-first-recording.htmlDo leave your comments as well.
Thanks..
Thanks and good luck Raja. Will surely check your songs out.
ReplyDeleteHello! Murali,
ReplyDeleteThanks! for your comment on my son's song.
Here is something i found which could be used as a default setting for Gverb
Room Size: 50
Reverb Time: 1.5
Damping: 0.1
Input Bandwidth: 0.75
Dry Signal Level: -1.5
Early Reflections: -10
Tail Level: -20
Cheers
- janhavee
Hi Murali,
ReplyDeleteThis is a well laid out tutorial. I tried it but the output is very noisy;
I'm using an onboard sound card and a really cheap mic. Mic seems okay when I check with the 'sound recorder' that comes with Windows. However when I record with Karaoke tracks, it goes cacophonic.
Need you suggestions please. Kudos!
superb..really helped!
ReplyDeleteFor karaoke recording "karafun" a free software which can be downloaded from www.download.com is also very simple software to use and record songs with karaoke for amatures at home in computer. If u want to correct ur vocal at some places u can do in this software without repeating the song fully. vocal track will be saved seperately.
ReplyDeleteThen u can mix both the track using other mixing software like acoustica mixcraft, cool edit pro etc..
Hi murali,
ReplyDeleteI am new to this home recording,blogging stuff.
I am using audacity for the recording,mixing purposes.Actually I have no idea how to do the mixing.Do we need to apply the all the effects like compressor,normalize,echo,reverb etc.Can you suggest some recommended values for these effects?
Great info murali. Roshni of http://v4m.blogspot.com/ pointed me to your blog when I asked her for info on the equipment. You have very useful information here. Thanks a lot for putting it together. I have a question.. right now zzsounds is offering a starter pack with the tascam soundcard and I wondered what you thought of that, if I could just use that instead of buying all the other equipment. Here is the link - http://www.zzounds.com/item--TASUS122L
ReplyDeleteThanks Murali. I found it immensely helpful.
ReplyDeleteVery interesting, well I suggest listen to your favorite songs and try to pin out each instrument that is being used, and try to copy that as an example for your own musical creation!
ReplyDeletepc recording studio
Thanks Murali for the info. This is my first time and will this equipments work on windows 7 laptops.
ReplyDeletehello friend,
ReplyDeletei am using mixcraft pro 6version and let me say you this daw is really very easy to use and to provide nice effects to your vocals like a proffesionals.....as we r recording most of the indian songs hence effects like reverb,delay,compression,and moreover the pultronic tube effect(for songs belong to 60s,70s,80s)really sound pretty proffesional.....but my problem lies to choose a perfect microphone....as all we know ordinary microphone does nt capture the proper bass of your voice and sounds really different from your actual voice....so could you plz consider my problem and suggest me a microphone in the range of 1000 rs to 2000rs!......also i have auto vst effect(noise reduction)in my baw which helps me to record only my vocals besides the surrounding innecessary noise.....
another point-if u r having asio software installed in your system then u dont need to have external soundcard as it reduces the big latency problem autometically with a good effect
thanking you....